Contents
Layers are ConTeXt's mechanism for absolute positioning of elements and other advanced techniques like switching elements on and off. There’s still no manual about them.
My first Layer
Define a layer that takes the whole page
\definelayer[mybg]  % name of the layer
    [x=0mm, y=0mm,  % from upper left corner of paper
     width=\paperwidth, height=\paperheight] % let the layer cover the full paper
Now you can put something in that layer:
\setlayer[mybg]	% name of the layer
    [hoffset=1cm, voffset=1cm]  % placement (from upper left corner of the layer)
    {\framed[frame=on, width=3cm, height=2cm]{LAYER}}  % the actual contents of the layer
Activate the layer as a background:
\setupbackgrounds[page][background=mybg]
This command makes the contents of the layer appear only once after the background is activated. If you want to repeat the contents of the layer on each page, use the option repeat=yes in the \definelayer command. Then the contents of the layer will be shown on every page. You can add to these contents by a new \setlayer[mybg] command. To clear the accumulated contents use \resetlayer[mybg]. To make the layer appear on each page, so that it can be populated with different content, set the option state=repeat in \setupbackgrounds.
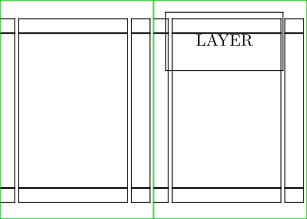
Now you can test the whole thing:
-
\setuppapersize[A10][A9,landscape]
\setuparranging[2UP] % two pages side by side
\showframe % show entire pages

\definelayer[mybg]	% name of the layer
    [x=0mm, y=0mm,	% from upper left corner of paper
     width=\paperwidth, height=\paperheight, % let the layer cover the full paper
     ]

\setupbackgrounds[page][background=mybg]

\setlayer[mybg]	% name of the layer
    [hoffset=0.2cm, voffset=0.2cm]  % placement (from upper left corner of the layer)
    {\framed[frame=on, width=2cm, height=1cm]{LAYER}}  % the actual contents of the layer

\starttext

\dorecurse{2}{\page[empty]} % for testing, to get 2 pages, 1st with layer, 2nd without

\stoptext
-
Placement
There are several possibilities for defining the placement of layer content:
- x, y : offset from upper left corner of paper [=the current block; can sometimes be the text area instead of the page/paper!]
- hoffset, voffset : offset from upper left corner of layer
-
corner : reference point, something like
{left, top} -
location : alignment of the element relative to the corner, something like
{right, bottom} - preset : a named location, see below
There are some "presets" for paper edge placement:
% These four are defined by ConTeXt!
\definelayerpreset	[lefttop]	[corner={left,top}, location={right,bottom}]
\definelayerpreset	[righttop]	[corner={right,top}, location={left,bottom}]
\definelayerpreset	[leftbottom]	[corner={left,bottom}, location={right,top}]
\definelayerpreset	[rightbottom]	[corner={right,bottom}, location={left,top}]
Similarly you can define your own presets.
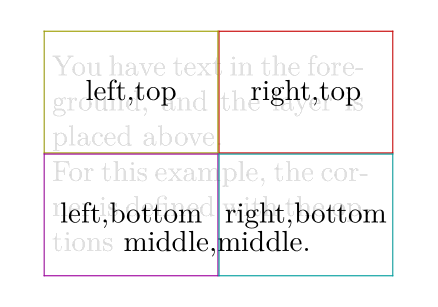
Understanding "location" and "corner"
The layer is divided into a 2x2 matrix of squares, where 'x' is the center. This gets you a total of 3x3=9 different corners.
o---o---o
|   |   |
o---x---o
|   |   |
o---o---o
Now you choose one 'corner' (the reference point) for the placement of the content. The content is placed in relation to this point. The chosen 'corner' c is our new 'center point' (only for placement) now.
With 'location' you define where (in relation to 'corner') the content is placed. Again you have nine different corners to choose from.
-
\setuppapersize[A8,landscape]
\setupheadertexts []
\setupbodyfont[14pt]

\setupframed
  [frame=on,
   location=top,
   offset=0pt,
   rulethickness=0.5pt,
   strut=yes,
   width=0.4\paperwidth,
   height=0.4\paperheight]

\definelayer[mybg]
  [width=\paperwidth,
   height=\paperheight,
   corner={middle,middle}]

\setlayer[mybg]
  [location={right,top}]
  {\framed[framecolor=middlered]{right,top}}

\setlayer[mybg]
  [location={left,top}]
  {\framed[framecolor=middleyellow]{left,top}}

\setlayer[mybg]
  [location={left,bottom}]
  {\framed[framecolor=middlemagenta]{left,bottom}}

\setlayer[mybg]
  [location={right,bottom}]
  {\framed[framecolor=middlecyan]{right,bottom}}


\starttext

\setupbackgrounds[page][background={foreground,mybg}]

\color[lightgray]
{You have text in the foreground,
and the layer is placed above.\\
For this example, the corner is defined
with the options} middle,middle.
\stoptext
-
An example to make this clear
Specifications corner={top,right},location={bottom,right} will place content in the area L (outside the original layer).
Think about the 'corner' c as a magnetic grid point, where the content snaps to.
The 'location' defines, from which direction we approach the point c.
- x = layer center point
- c = corner 'top,right'
- d = location 'bottom right'
- L = location (area)
        o---o---o
        |   |   |
----o---c---o
|   |   |   L   |
----x---o---d
|   |   |
---------
An example: placing a logo to the top right corner of the page
-
\definelayer
  [Logo]
  [location={left,bottom},
   x=\paperwidth,y=0mm,
   hoffset=-5mm,voffset=5mm,
  ]

\setlayer[Logo]
  {\framed[width=3cm,height=1cm,background=color,backgroundcolor=lightgray]{Logo...}}

\setupbackgrounds[page][background=Logo]

\starttext
  %\showframe

  Some text...
\stoptext
gives:
-

Often it makes sense to use a preset (e.g. "lefttop") and move the contents with "hoffset" and "voffset" (positive values move into the page, negative values move into the outer borders).
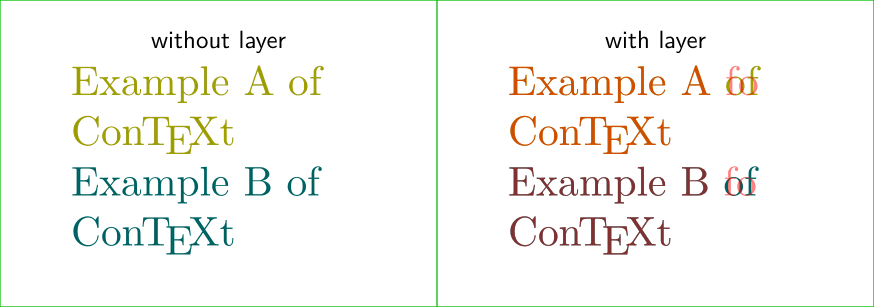
Example: exact overlay of page text and layer text
-
\definepapersize[sheet][width=148mm,height=52mm]
\setuppapersize[A8,landscape][sheet] % 52 x 74 mm
\setuppaper[nx=2,ny=1]
\setuparranging[XY]
\showframe[edge]

\setuplayout
  [topspace=2mm,        % Vertically
   height=48mm,
   header=5mm,
   headerdistance=3mm,
   footer=5mm,
   footerdistance=3mm,
   backspace=12mm,      % Horizontally
   width=50mm,
   margin=6mm,
   margindistance=3mm,
   grid=yes]            % Required

\setupbodyfont[20pt]
\definecolor [transparentred]  [r=1,t=.5,a=1]

\setupframed
  [frame=off,
   location=top,
   offset=0pt,
   rulethickness=0.pt,
   strut=yes,
   align={flushleft,tolerant}]

\definelayer[mybg]
  [x=0mm, y=0mm,width=\paperwidth, height=\paperheight]
  [corner={left,top},
   location={right,bottom}]

\setlayer[mybg]
    [hoffset=\dimexpr(\backspace)\relax,
     voffset=\dimexpr(\topspace+\headerheight+\headerdistance)\relax,]
    {\framed[foregroundcolor=transparentred]
     {Example A fo\\ \ConTeXt}}

\setlayer[mybg]
    [hoffset=\dimexpr(\backspace)\relax,,
     voffset=\dimexpr(\topspace+\headerheight+\headerdistance+2\baselineskip)\relax,]
    {\framed[foregroundcolor=transparentred]
     {Example B fo\\ \ConTeXt}}

\starttext
\setupheadertexts [{\tfxx\ss without layer}]

\color[middleyellow]
  {Example A of\\ \ConTeXt}

\framed
  [foregroundcolor=darkcyan]
  {Example B of\\ \ConTeXt}

\page
\setupheadertexts [{\tfxx\ss with layer}]
\setupbackgrounds[page][background={foreground,mybg}]

\color[middleyellow]
  {Example A of\\ \ConTeXt}

\framed
  [foregroundcolor=darkcyan]
  {Example B of\\ \ConTeXt}

\stoptext
see on the second page when the transparent red text of the layer is stacked (and see the check based on 'of' VS 'fo' for the layer):
-
State
The available options for the "state" of a layer are:
- start: layer appears only on the current page
- stop: layer doesn't show up
- repeat: layer prints on all pages
- next: layer appears on the following page
- continue: layer appears on all pages except the first
Layers on top
Usually, layers are in the background of your page (or text area). But sometimes you need your layer content on top of the regular content. Then you must set the foreground as one of the backgrounds like this:
\setupbackgrounds[page][background={mybacklayer,foreground,myfrontlayer}]
The order of backgrounds from left to right is from bottom to top.
Line breaking and fixed size
You may experience cases where the defined size of your layer is ignored and you can’t get linebreaking or multiple lines at all. This is due to \setlayer using \hbox internally. You can work around the problem using \setlayerframed:
-
\setuppapersize[A6]

\definelayer[AddressBg][
    x=20mm, y=30mm,
    width=65mm, height=30mm,
    state=start] % size is ignored!
\setupbackgrounds[paper][
    setups=ALayer,
    background=AddressBg,
    state=start]

\starttext
\strut
\startsetups ALayer
    \setlayer[AddressBg]           % Change this to \setlayerframed to get it to work
        [width=65mm, height=30mm,
         frame=off,
         hoffset=0mm, voffset=0mm,
         align=right]                    % You must set align to get multiple lines!
        {
            PRAGMA Advanced Document Engineering\crlf
            Mr. Hans Hagen (the wizard who wrote it all, \CONTEXT\ and everything else,
                with the help of his little elves)\crlf
            Ridderstraat 27\crlf
            8061GH Hasselt\crlf
            THE NETHERLANDS
        }
\stopsetups
\stoptext
-

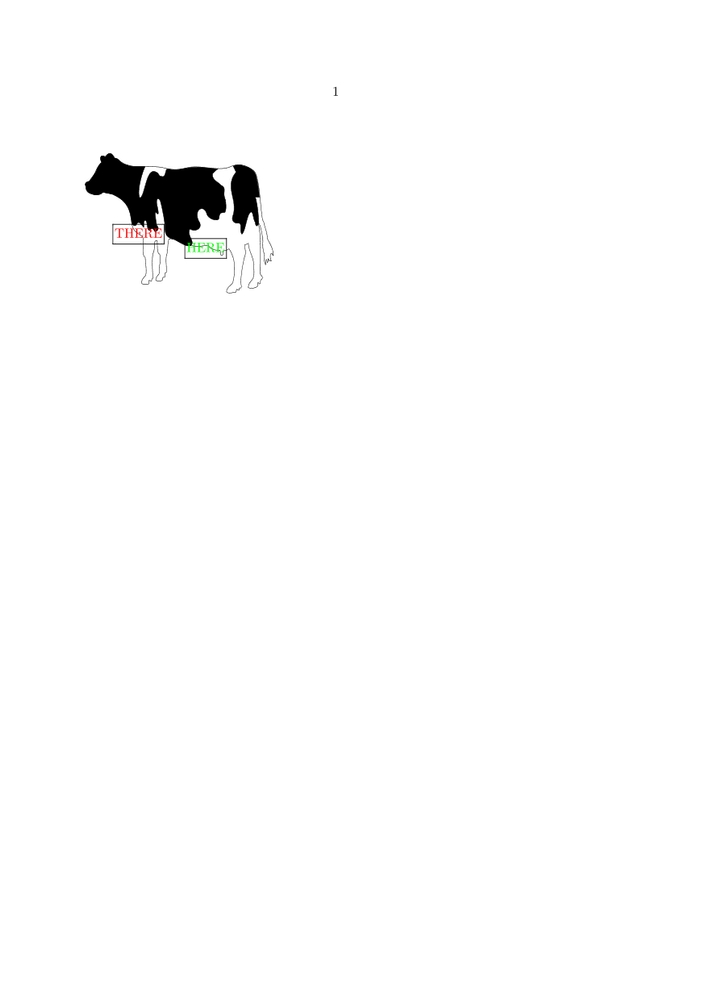
Place labels on pictures
Layers can be used to put labels on pictures, alternative ways can be found in the Details manual (see also Collectors).
-
\setupexternalfigures[location={local,default}]
% (necessary for the wiki conTeXt live processor)

\definelayer  [figure][width=\overlaywidth,height=\overlayheight]
\defineoverlay[figure][{\directsetup{figure}\tightlayer[figure]}]

\setupcolors[state=start]

\starttext

\startsetups figure

\setlayerframed
  [figure]
  [preset=rightbottom,
   x=.25\layerwidth,
   y=.25\layerheight]
  {\green HERE}

\setlayerframed
  [figure]
  [preset=leftbottom,
   x=.15\layerwidth,
   y=.35\layerheight]
  {\red THERE}

\stopsetups

\externalfigure[cow][background={foreground,figure},width=4cm,height=3cm]

\stoptext
-
Use dynamic content
The content of layer is fixed after your set it and will appear in the same way on each page.
\definelayer
  [pagenumber]
  [width=\paperwidth,
   height=\paperheight,
   preset=middle,
   state=repeat]

\setlayer[pagenumber]{Page \pagenumber}

\setupbackgrounds[page][background=pagenumber]

\starttext
\dorecurse{4}{\page[empty]} % Every page will say "Page 1"
\stoptext
This is not always what you desire like in the example above, where on each page the current page number should be shown and not the number from the first page.
To recalculate the content on each new page you have to enclose the \setlayer settings within \startsetups ... \stopsetups and
write \setupbackgrounds[page][setups=setupname,background=layername] in your document.
\definelayer
  [pagenumber]
  [width=\paperwidth,
   height=\paperheight,
   preset=middle]

\startsetups layer

\setlayer[pagenumber]{Page \pagenumber}

\stopsetups

\setupbackgrounds[page][setups=layer,background=pagenumber]

\starttext
\dorecurse{4}{\page[empty]} % You get "Page 1, Page 2" etc.
\stoptext
Setups, by design, ignore the spaces inside them, so use \space, \crlf, \par, etc., to request spaces, or use \startrawsetups.
\definelayer
  [pagenumber]
  [width=\paperwidth,
   height=\paperheight,
   preset=middle]

\startsetups layer

\setlayerframed[pagenumber][align=middle]{Page Number: \par \pagenumber}

\stopsetups

\setupbackgrounds[page][setups=layer,background=pagenumber]

\starttext
\dorecurse{4}{\page[empty]} % You get "Page 1, Page 2" etc.
\stoptext
Another solution for dynamic content was given by Wolfgang on the mailing list on February 21, 2012. He writes: Here is a slightly different version which is better when you need more dynamic layers.
\definelayer  [pagenumber][width=\overlaywidth,height=\overlayheight,preset=middle]
\defineoverlay[pagenumber][\texsetup{layer}]

\startsetups layer

\setlayer[pagenumber]{Page \pagenumber}

\tightlayer[pagenumber]

\stopsetups

\setupbackgrounds[page][setups=layer,background=pagenumber]

\starttext
\dorecurse{4}{\page[empty]}
\stoptext
Layers and the delayed font mechanism
TL;DR: Setup your fonts before your layers.
Until some years ago the Latin Modern font was always automatically loaded, regardless of the users choice of font. Font loading takes a considerable amount of time (check the stats at the end of a context run to get an idea). This led to the question:
“Why start loading a big, complex font like Latin Modern before we know which font the user actually wants to use and waste several seconds on it, just to start loading the users choice afterwards?”
The answer was:
”We delay loading the font until we know which font the user wants to use. If the user doesn't tell us, then we fall back to Latin Modern.”
The body font is set up in the setup area (the part above
\starttext). That, in turn, means that when having reached
\starttext, the users choice of font is known and can be loaded. It
is more efficient if a font other then Latin Modern is used.
One drawback is that typeset text in the setup area has no font setup and will fall back to Latin Modern Mono. Usually no text is typeset in the setup area. However, layers are an exception and a font needs to be set up beforehand.
Layers in fitting pages
Fitting pages have no fixed dimensions, but they are taken from their content. Layers require dimensions to be placed on the page.
Hans provided two alternative methods to do it:
\starttext

   \definelayer[hi]

   \startTEXpage[background=hi]
     \setbox\scratchbox\hbox\framed
       [frame=off,offset=none,align=middle]
       {\input{tufte}}%
     \setuplayer
       [hi]
       [width=\wd\scratchbox,height=\htdp\scratchbox]
     \setlayer
       [hi][preset=middle]
       {\color[green]{there}}
     \box\scratchbox
   \stopTEXpage

   \defineoverlay[hi]

   \startTEXpage[background=hi]
     \defineoverlay
       [hi]
       [{\framed [frame=off, offset=overlay, width=\overlaywidth, height=\overlayheight]
           {\color[red]{there}}}]
     \framed
       [frame=off,offset=none,align=middle,background=hi]
       {\input{tufte}}%
   \stopTEXpage

\stoptext
See Also
- Layers are on of the Stacking mechanisms , there is also Overlays and Collectors
- An example, Alternating backgrounds and repeating layers like Watermarks (2007). For a somewhat different example, based on overlays, see Draft Watermark example
- Some applications in the Details manual
- Sample documents : BusinessCard and Letter style
- Source: pack-lyr.mkii or pack-lyr.mkiv
- Layer vs. overlay by Wolfgang
- \setupbackgrounds
- \definelayer , \setuplayer
- \setlayer , \setlayerframed
| TODO: We need a lot of documentation and samples for this complicated subject. (See: To-Do List) |